Friday, June 25, 2010

Stern Compartments

The stern compartments are almost in place. All I need are the hinges. Port side is for the live bait well. Starboard side will house the battery and other things like life jackets or tackle box.

Molding still needed in the self bailing well.


Front view of storage compartments and gas tank compartment.


Sides just got wet sanded. A coat of paint will be applied shortly.


FOLKS IT'S HOT OUT HERE!

Mid Morning Job

From the crack of dawn here is the Big Tuna’s progress.

Power lines completed for navigation lights, bilge pump and aerator.
Luis painting rear walls of storage compartments.


Floor planks sanded and water proofed.

Now we have to get them installed. This should take about 5 hours or so.

More updates as progress is made.


Let’s get crackalackin.

We have just under24 hours to go prior to inspection. We are on our way to the lumber yard to get the last items that we need. Stay tuned throughout the day for updates every hour or so.

See later this morning!

Monday, June 14, 2010

Drain Plug and Engine

Almost seemed like nothing was accomplished last week and into the weekend. If it was not one thing, it was another.
I did manage to install the drain plugs and the engine. We put the center consol in place but only to make sure we had the right length of cables for the steering, electrical harness and throttle control cables.

I also gave the inside a second coat of paint and used marine silicone to seal any minor openings along the frame and the floor. This was the part that really took up most of the weekend.

So let’s check it out.

For starters, I recomend inserting your drain plugs prior to mounting the engine. But I got so fired up about mounting the engine, I skipped that step. It makes it easier to intall the drain plugs without the engine.


After drilling your hole, make sure  you cover the inside of the hole with epoxy. Don't just rely on the silicone. I used five minute epoxy and saturated the inside of the drain hole. Then I put a generous amount of marine silicone on the outside of the drain plug.


Squeeze the drain plug in place. You should feel some resistance when you try to tug on it. If so, you know you got a nice fit.


Drill your pilot holes for the brass screws. When doing so, also put silicone inside the pilot hole. After you tighten the plug in place, you want to see some of the silicone ooze out. Now you know you have a good seal. Some boat builders like to wipe off the excess of the silicone for looks. I chose to leave just a little on the edges. Why? It makes me think that I got a good seal.


For the engine well, measure to find the center line and correct width. Check you engine specs to make sure  you have the proper size opening so that the engine turns free of obtructions.


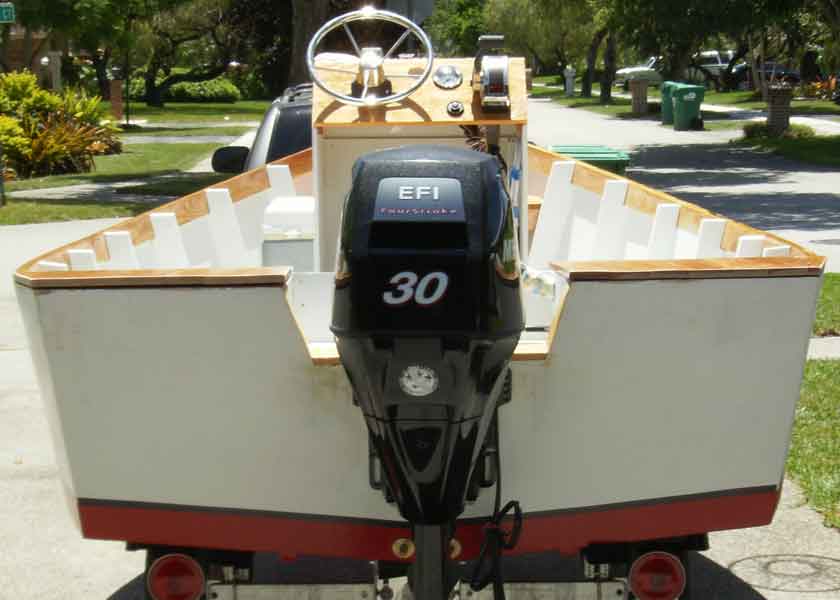
Mount your engine in place and make sure it's right on the center line. Turn it to the left and right to ensure there are no obstructions. If there is, clear the obstruction before proceeding to bolt the engine in place.


View from port side with center consol. Note center consol in not fixed in place as of yet. It was only put there to check cables and ascetics of the boat.


Other than that, the Sunday afternoon smoked ribs rocked! The margaritas were great and over all, there was some progress on Big Tuna.

Monday, June 7, 2010

The Center Console Continued

Tried to finish the CC this weekend but the weather and all the other “goings on” distracted me. Here is a view of the CC which is just about finished. The back face was reinforced with fiberglass and epoxy and the front has a very nice thick and smooth coat of epoxy. It looks like the instruments are sitting on a layer of glass.
I have not decided whether to put the switch panel below the instruments or on the side of the console. I have to make room for the radio and I really would not like it sitting on the top. That empty space below the instruments may be the place for the radio. I'll cross that bridge once I get to it.


Center Console with instruments Left to right: Teleflex Helm, Water Pressure Gage, RPM Gage, Throttle mount.

It’s going to be an exciting week for the Big Tuna. Tomorrow we finalize the opening for the engine mount. Here is this week’s schedule:


Tuesday 06/08 – Complete engine mount
Wednesday 06/09 – Complete engine opening trim
Thursday 06/10 – Build self bailing well
Friday 06/11 – Begin electrical
Saturday 06/12 – electrical and install self bailing well
Sunday 06/13 – Mount CC on floor / Smoke some ribs on the smoker!


I'll keep you guys posted on the progress.

Wednesday, June 2, 2010

The Center Console

The design of this boat did not call for a center consol, I elected to put one in. After walking around in the inside of the boat, I realized that I did not want to be so far back sitting on the stern holding a tiller. It just seemed more obvious to have a center consol. Besides I love all the instruments and other gadgets that go on a center console. I guess it’s a guy thing.

I could have bought a center console but in my book, that would have been cutting corners. I figured that if I had already built a boat, why not go all the way and build the center console. I could have picked up a fiberglass ready made console but a real boat builder would have made his/her own console.

The hardest thing about building the center consol is the design. I searched all over and took plenty of pictures of consoles at my local boat lots and of course, Bass Pro Shops. After looking at so many different styles, I could not make up my mind on what to build. Finally I just went for it and started making sketches and cutting card board until I came out with one that was easy to build and somewhat pleasing to the eye. This is what I came up with.

Cardboard cut out of console.
After deciding on the correct size, we cut the floor and sanded all sides.
The sides were then cut out. Note that I gave it a slight taper to get rid of the straight lines.


Sides are mounted as well as the front.
The interior was coated with epoxy resin and the outside was covered with fiberglass.

Plastics clips held the glass in place.

Outside coated with epoxy over the fiberglass. Looks pretty professional if you ask me. Once the epoxy dried, I used a razor blade to cut off the excess fiberglass and made a nice clean edge.
After the epoxy dried and the excess trimmed, I lightly sanded the outside. I then used a roller to paint it flat white. The inside and outside as painted on the same day.
Almost completed. Now for the console goodies!

This is not the final lay out of the instruments, throttle and switch panel. The items shown are props that I made to the exact demensions of the items that need to be put in: Switch panel, water preasure guage, RPM and throttle. The point here is to use the props and move them around until you like what you have. Once the holes are made and you dont like it, you're either stuck with it or you build a new front board. Unless you have OCD, you will learn to live with it 

I still have to epoxy the mounting face, where all the instruments go, and then cut out the holes. I hope to have the center console completed by the weekend.

If you want the demensions of the console to compare to what you're building, email me and I'll forward you my sketches and final demensions.

Thursday, May 20, 2010

The Big Tuna is Official

It’s official. The Big Tuna has a HIN (Hull Identification Number) and a registration number!  In order to register your home built boat in the state of Florida you will need the following:

Form HSMV 82040
Application for Certificate of Title With/Without Registration
Form HSMV 87002
Vessel Statement of Builder
You must have copies off all the receipts of the materials purchased to build your boat. Make sure the tax is on all the receipts. Though the information on the web pages say to bring copies, I was asked for the originals. Luckily, I had them with me.

For your trailer:

Form HSMV 82040
Application for Certificate of Title With/Without Registration
Certificate of Origin For A Vehicle
Receipt of purchase

You can get more information at:
http://www.flhsmv.gov/html/forms.html   - TO DOWN LOAD FORM HSMV 82040
www.flhsmv.gov/hsmvdocs/dmv87002.pdf - TO DOWN LOAD FORM HSMV 87002
http://www.flhsmv.gov/dmv/faqboat.html - INFORMATION

The department accepts: Cash, money orders, personal checks. No credit or debit cards.


Hope the info was useful!