It’s official. The Big Tuna has a HIN (Hull Identification Number) and a registration number! In order to register your home built boat in the state of Florida you will need the following:
Form HSMV 82040
Application for Certificate of Title With/Without Registration
Form HSMV 87002
Vessel Statement of Builder
You must have copies off all the receipts of the materials purchased to build your boat. Make sure the tax is on all the receipts. Though the information on the web pages say to bring copies, I was asked for the originals. Luckily, I had them with me.
For your trailer:
Form HSMV 82040
Application for Certificate of Title With/Without Registration
Certificate of Origin For A Vehicle
Receipt of purchase
You can get more information at:
http://www.flhsmv.gov/html/forms.html - TO DOWN LOAD FORM HSMV 82040
www.flhsmv.gov/hsmvdocs/dmv87002.pdf - TO DOWN LOAD FORM HSMV 87002
http://www.flhsmv.gov/dmv/faqboat.html - INFORMATION
The department accepts: Cash, money orders, personal checks. No credit or debit cards.
Hope the info was useful!
Thursday, May 20, 2010
Monday, May 17, 2010
Anchor Well and Interior Paint
Had a busy weekend! The anchor well was made and the interior got the first coat of paint. I’ll be applying a second coat on the sides and to the floor aft of the boat.
For the anchor well I used 3/8” ply and I covered it with 6oz fiberglass and acoat of epoxy when I was finished.
Here is the dilio on the anchor well.
 Card template cut and put in place.
Template layed out on the ply and then traced.

After cutting and making final adjustments, cover the back wall of the anchor well with fiberglass.

Now it's time for the hatch. I used clear fir for the hatch and it will be stained and covered nicely with a coat of epoxy.


Thursday, May 13, 2010
The BIG Turn!
The moment was here. It was finally time to turn the Big Tuna. All night I thought about the logistics. Who was going to stand at what position and how we were going to lift it. Funny this was that it never turned out exactly how I expected. It was almost like an episode of the The Key Stone Cops but the bottom line was that we got the job done safely. No one got a toe smashed and not a scratch on the Big Tuna. In addition, it was great to see everyone lend a hand and for that I am very grateful.
Lesson: Things don’t always go right by the book but as long as it happens….It happened
 All safety brackets removed and ready to lift.
Safe touch down and now for the big turn....

Quite honestly I had no idea that this boat was this big.

Now what?


Wednesday, May 12, 2010
Pacific Dory Fleet
A 2007 article written by Sara Gray on Northwest Magazines. Nice looking boats. Shows how strong they are. Enjoy.
http://www.northwestmagazines.com/oregon_coast_pacific_city_dory_fleet.php
http://www.northwestmagazines.com/oregon_coast_pacific_city_dory_fleet.php
Tuesday, May 11, 2010
Color Scheme
I painted the boat about 15 different times on paper. I copied the plans on 8x11 paper and used colored pencils to get a feel for what it woul look like. I knew I wanted to stay away from the traditional blue bottom which is what you see a lot of in my area.
Somehow I always came back to the red and white. So, living in democracy I put it up for a vote with the family. The kids voted for the red and white. I thought about painting SOS on the bottom just in case anything should happen however, if I did that I would only be inviting an unwanted situation if you know what I mean.
I first gave the entire outer hull a coat of Rust-O-Leum primer. I then painted it with Rust-O-Leum oil based paint. I know that it is not a traditional boat paint but it appeared to have held very well. Rust-O-Leum does make marine paint but to be honest, I don’t really think it was worth it since my boat will not sleep in the water. If you don’t use marine paint, I recommend a good quality oil based paint. Stay clear of latex.
Everything was rolled on with a smooth foam roller. No spray gun used and honestly if painted correctly with a roller, a spray gun is really not needed. The paint was thick enough and settled nicely without any roller streaks.
The Big Tuna got two coats of primer. When dried, I sanded it very lightly. Then it got two coats of each color (red and white). When it all dried, I gave it two coats of Rust-O-Leum clear finish.
 Preping the surface with primer.

Mask off your area if you are going to use 2 tones of colors. Keep that line straight. You can make a simple template and run it with a pencil to mark your line. Paint early and out of the direct mid day hot sun.

Keep it going. Stay in a rhythm. I think I was jamming to a little Jimmy Buffet while I was painting.
 Break time for me. I did the middle where Lou Jr. could not reach. He did the rest and a fine job that he did.

Officially completed.
 I had not seen an ice cream truck in over 30 years. I thought they were extinct. After a tough morning of painting. Some lunch time icecream was well in order. I had that cone with the gum ball on the bottom. Boy did that bring back memories.
Somehow I always came back to the red and white. So, living in democracy I put it up for a vote with the family. The kids voted for the red and white. I thought about painting SOS on the bottom just in case anything should happen however, if I did that I would only be inviting an unwanted situation if you know what I mean.
I first gave the entire outer hull a coat of Rust-O-Leum primer. I then painted it with Rust-O-Leum oil based paint. I know that it is not a traditional boat paint but it appeared to have held very well. Rust-O-Leum does make marine paint but to be honest, I don’t really think it was worth it since my boat will not sleep in the water. If you don’t use marine paint, I recommend a good quality oil based paint. Stay clear of latex.
Everything was rolled on with a smooth foam roller. No spray gun used and honestly if painted correctly with a roller, a spray gun is really not needed. The paint was thick enough and settled nicely without any roller streaks.
The Big Tuna got two coats of primer. When dried, I sanded it very lightly. Then it got two coats of each color (red and white). When it all dried, I gave it two coats of Rust-O-Leum clear finish.


Mask off your area if you are going to use 2 tones of colors. Keep that line straight. You can make a simple template and run it with a pencil to mark your line. Paint early and out of the direct mid day hot sun.

Keep it going. Stay in a rhythm. I think I was jamming to a little Jimmy Buffet while I was painting.


Officially completed.

Monday, May 10, 2010
The Glassing
The Glassing was not as difficult as it looked. You will be surprised at how easy it is. Just go slow and keep mixing. A helping hand from a buddy would be great. He or she can mix while you role and help by keeping the fiberglass in its place.
There are two basic methods of rolling on the fiberglass. I believe they are called the wet method where the epoxy is rolled on and then the fiberglass is laid on and then a second coat of epoxy is rolled on.
The second method is the dry method. The fiberglass is rolled on to the dry surface and then the epoxy is rolled on. I used this method because it appeared to be easier to work with. Once the fiberglass goes on using the wet method, it’s a little harder to move around.
 Glass laid out on the bottom hull. Epoxy being rolled on. Make sure you overlap the sides. Mine overlapped by about 4 inches.

Gil rolling on epoxy.
 The sides. Note the overlap at the top. You cant see the fiberglass on the top because it turns invisible when it gets wet with the epoxy. This overlap is good for the seams of sides and bottom.
 More glassing on the sides.

All done with the glassing. I gave the bow an extra layer of 6oz fiberglass for reinforcement. I figured it would not hurt. Note that I left the bottom edges hanging down. Leave them alone for now. It will be easier to trim the fiberglass when the epoxy cures. Doing it now while it's wet is pretty much useless. Let everything dry for at least 24 to 48 hours.
There are two basic methods of rolling on the fiberglass. I believe they are called the wet method where the epoxy is rolled on and then the fiberglass is laid on and then a second coat of epoxy is rolled on.
The second method is the dry method. The fiberglass is rolled on to the dry surface and then the epoxy is rolled on. I used this method because it appeared to be easier to work with. Once the fiberglass goes on using the wet method, it’s a little harder to move around.


Gil rolling on epoxy.


All done with the glassing. I gave the bow an extra layer of 6oz fiberglass for reinforcement. I figured it would not hurt. Note that I left the bottom edges hanging down. Leave them alone for now. It will be easier to trim the fiberglass when the epoxy cures. Doing it now while it's wet is pretty much useless. Let everything dry for at least 24 to 48 hours.
Thursday, May 6, 2010
The Sanding
This was a pretty relaxed and fun day. Dirty but fun. I recruited the kids and neighbors for some help and we had couple of cold ones in between breaks. Lou Jr. had his Coke on the rocks.
Consider having the following ready to go as it will save you time:
Safety glasses60 grit sandpaper (already cut to your sander’s specs)
100 grit sandpaper (already cut to your sander’s specs)
Organize everything in stacks so as the sanding paper wears down you have the next one ready to go.
Dust masks – at least 2 per person
Big brushes for sweeping.
An air compressor or a yard blower.
The day before you sand, make sure you have filled the seams with epoxy. For bigger gaps you can thicken the epoxy with microfibers or fine saw dust. I started with the saw dust as a filler/thickener and transitioned later in the project to the microfibers.
Don’t rush it. Take breaks, stand back, look. Start again. It’s also a fun time to BS with your friends on who has what fishing spot on the boat and who’s catching the biggest fish.
This phase took about a solid 6 hours of work. It was later followed by some smoked baby back ribs later in the evening.
This phase took about a solid 6 hours of work. It was later followed by some smoked baby back ribs later in the evening.

Junior building up those arms!

A quick "water" break! We were covered in dust.


Gil doing his thing.
 Note the ship yard manager in the background downing one and slacking off. Can you beleive this guy?
 Sanding completed and ready for the glass!
Wednesday, May 5, 2010
Bottom Planking
The bottom planking was perhaps the hardest part of the build. Particularly the bow. Your patience will be tested and your “happy mood” will likely turn sour.
 Drilling down on the rear bottom planks.

Rear bottom planks completed. The over hang will be cut off and then sanded down flush to the sides.
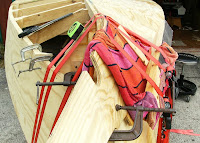
 Front planks. The hard part is about to come! Get creative and use straps to help you hold the plank in place. Once you begin to screw the plank in place, you can release the straps.

Cut away what you dont need and continue to strap the plank down. Get ready...here comes the hard part!
 Look at how much that plank has to bend in order to meet at the bow! That bottom plank is 19/32" thick. Ouch!
 In order to bend the plank to meet the bow, you will have to steam it, boil it, heat it, curse at it, punch it and bite it.
 A good trick to bend that wood is to pour boiling water on the wood. Use and old towel to absorb the water and retain the theat. The wood will get wet but it’s the only way to bend it to put in it’s place. Be patient. “Let the wood talk to you.” Wet it down, and then tighten the straps. Repeat. You may have to pause once in a while but most importantly, let the wood talk to you – as silly as it may sound it will talk to you.
 BECARFUL of the boiling water. It will drip down to your feet. In my case I “accidentally unpurpose” managed to trip and some of the water fell off the pot and down to me feet. Yes, I was wearing sweats, socks, and sneakers and it still managed to burn my ankle. I sucked this one up with an asprin and a shot of whiskey and continued to work!
 You see. It will bend. But in my case my patience bent before the plank did. Thanks to Svein Kopfelt for this technique to help bend the wood.
 Get creative. Your boat may be different. I used to piece of wood and a clamp to bring the last few inches to meet the bow. Boiling water, a couple of turns on the clamp. Listen. Look. Boiling water, a couple of turns on the clamp. Listen. Look. And so on and so on until the plank touches the bow.

You’re not done yet. Once you finish one side, you have to do the other side. This time you have more experience and it should go a little smoother. Once the bottom is finished, trim as close as you safely can to the edge. Follow up with a belt sander to sand it flush to the sides. It finally looks like a boat!
Overall this was perhaps the hardest part of the build. Many thanks to Jeff Spira, Svein Kopfelt and Gil Purdee for their support. Next step was to sand and fiberglass the outside. Stay tuned tonight for more pictures on fiberglassing and painting. Then.....THE BIG TURN!


Rear bottom planks completed. The over hang will be cut off and then sanded down flush to the sides.


Cut away what you dont need and continue to strap the plank down. Get ready...here comes the hard part!


You’re not done yet. Once you finish one side, you have to do the other side. This time you have more experience and it should go a little smoother. Once the bottom is finished, trim as close as you safely can to the edge. Follow up with a belt sander to sand it flush to the sides. It finally looks like a boat!
Overall this was perhaps the hardest part of the build. Many thanks to Jeff Spira, Svein Kopfelt and Gil Purdee for their support. Next step was to sand and fiberglass the outside. Stay tuned tonight for more pictures on fiberglassing and painting. Then.....THE BIG TURN!
Tuesday, May 4, 2010
Slow Week for the Big Tuna
To much going on to work on the Big Tuna last night. I did however manage to take care of some of the small details which we all know can ad up.
I did seal every opening or shall I say “edge” where there may have been a very small gap inside the boat. Particularly along the edges of the frames where they meet with the shear log and the chine log. Looks fantastic. I also managed some of the administrative matters. I finally gathered all pics to post on the blog! I had no idea that I had so many! Always take plenty of pictures so you can document the entire building process.
I’m currently posting one big entry to catch up on all pictures to this point in time. Stay tuned, it should be ready shortly.
Monday, May 3, 2010
It's Been Crazy
My apologies to everyone for not posting pictures or keeping you updated. I’m in the process now of updating the blog. Should be updated by late this evening.
Subscribe to:
Posts (Atom)