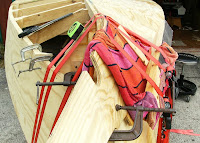
Drilling down on the rear bottom planks.

Rear bottom planks completed. The over hang will be cut off and then sanded down flush to the sides.
Front planks. The hard part is about to come! Get creative and use straps to help you hold the plank in place. Once you begin to screw the plank in place, you can release the straps.

Cut away what you dont need and continue to strap the plank down. Get ready...here comes the hard part!
Look at how much that plank has to bend in order to meet at the bow! That bottom plank is 19/32" thick. Ouch!
In order to bend the plank to meet the bow, you will have to steam it, boil it, heat it, curse at it, punch it and bite it.
A good trick to bend that wood is to pour boiling water on the wood. Use and old towel to absorb the water and retain the theat. The wood will get wet but it’s the only way to bend it to put in it’s place. Be patient. “Let the wood talk to you.” Wet it down, and then tighten the straps. Repeat. You may have to pause once in a while but most importantly, let the wood talk to you – as silly as it may sound it will talk to you.
BECARFUL of the boiling water. It will drip down to your feet. In my case I “accidentally unpurpose” managed to trip and some of the water fell off the pot and down to me feet. Yes, I was wearing sweats, socks, and sneakers and it still managed to burn my ankle. I sucked this one up with an asprin and a shot of whiskey and continued to work!
You see. It will bend. But in my case my patience bent before the plank did. Thanks to Svein Kopfelt for this technique to help bend the wood.
Get creative. Your boat may be different. I used to piece of wood and a clamp to bring the last few inches to meet the bow. Boiling water, a couple of turns on the clamp. Listen. Look. Boiling water, a couple of turns on the clamp. Listen. Look. And so on and so on until the plank touches the bow.

You’re not done yet. Once you finish one side, you have to do the other side. This time you have more experience and it should go a little smoother. Once the bottom is finished, trim as close as you safely can to the edge. Follow up with a belt sander to sand it flush to the sides. It finally looks like a boat!
Overall this was perhaps the hardest part of the build. Many thanks to Jeff Spira, Svein Kopfelt and Gil Purdee for their support. Next step was to sand and fiberglass the outside. Stay tuned tonight for more pictures on fiberglassing and painting. Then.....THE BIG TURN!


Looking good Lou! what colors did you use to paint it?
ReplyDeleteI went with the red bottom a thin black stripe and white sides. I'll be postin those pictures tonight!
ReplyDeleteWOW! I wondered about bending the plywood, now I know! Thanks!
ReplyDeleteBrad
Brad: It's not easy so be patient. It's not going to get done in a couple of hours. It took me all day just to bend it into shape. A full day for me was about 6 hours! I recomend a turkey frier type pot with a full tank of propane and a garden hose to keep lots of water boiling and ready.
ReplyDeleteThanks for the tip Lou!
ReplyDeleteBrad